
Last updated: October 2026
Quick answer: Relief depth is the height of the printing image above the plate floor. It is set in the plate room, mainly by back exposure (which builds the floor) and washout. Typical in the industry, thin 1.14 mm plates run well under 1 mm of relief, while 6.35 mm corrugated plates run several millimetres. Too shallow relief fills reverses and lets the floor print; too deep relief weakens fine dots.
Key takeaways
- Total plate thickness = polyester base + cured floor + relief.
- Back exposure time is the main control for floor thickness and therefore relief depth.
- Relief must match the gauge and the job: deeper is not always safer.
- Measure relief with a thickness gauge on every new grade and after any lamp or processor change.
- The grade TDS gives the recommended relief and back exposure starting point for each gauge.
Plate room operators know the symptoms even if they never measure relief: ink fills in reverse text, small dots fall over or bend, or the floor prints on the board. All three point to relief depth. Many plate rooms never measure relief, because they assume it is fixed in the raw plate. It is not. Relief depth on a flexo plate is set by plate making, and it can drift with lamp age, washout settings and operator habits. This article explains what relief depth is, what values are typical in the industry, how to measure and control it, and how to troubleshoot problems. For plate gauges and cylinder undercut, see our flexo plate thickness guide.
Flexo plate relief depth in brief
A processed photopolymer flexo plate has three layers. At the bottom is the polyester base, which gives dimensional stability. On top of it is the floor: polymer hardened from the back by back exposure. Above the floor stands the relief: the image areas hardened by main exposure through film or a LAMS mask. Washout removes the unexposed polymer between the image areas down to the floor.
Relief depth is the distance from the floor surface to the printing surface. Floor thickness and relief depth add up to a constant for a given gauge, so a thicker floor means shallower relief, and the other way round.
Typical relief depth by plate thickness
The table shows ranges that are typical in the industry. They are not our product specification. The recommended relief for each of our grades and gauges is in its TDS.
| Plate gauge | Typical relief depth (industry range) | Typical use |
|---|---|---|
| 1.14 mm | about 0.5 to 0.7 mm | Labels, flexible packaging, fine screens |
| 1.70 mm | about 0.6 to 0.9 mm | Flexible packaging, labels, folding carton |
| 2.28 mm | about 0.7 to 1.0 mm | Wide-web packaging, paper bags |
| 2.84 mm | about 0.8 to 1.2 mm | Corrugated preprint, sacks, fine-flute postprint |
| 3.94 mm | about 1.5 to 2.0 mm | Corrugated postprint |
| 6.35 mm | about 2.0 to 3.5 mm | Heavy and double-wall corrugated |
Thicker corrugated plates need more relief because fluted board is uneven and soft, so the floor must stay well clear of the substrate. Our corrugated flexo plates are made in the thick gauges this work needs, and our standard photopolymer flexo plates cover the thin and medium gauges.
How back exposure sets the floor
Back exposure is a short UV exposure through the polyester base before main exposure. It hardens a uniform layer of polymer from the back, which becomes the floor. Longer back exposure gives a thicker floor and shallower relief; shorter back exposure gives a thinner floor and deeper relief.
The floor also supports the image. Fine dots and thin lines stand on shoulders that grow from the floor, so a very thin floor leaves them poorly anchored. Back exposure also affects how much main exposure is needed to hold small dots. The standard way to find the right back exposure is a step test:
- Cut a strip of the plate and cover it so that each section gets a different back exposure time.
- Wash out the strip without main exposure, then dry and finish it as normal.
- Measure the floor thickness of each section with a thickness gauge.
- Choose the time that gives the floor for the target relief in the TDS.
Washout also matters. Washout that is too short leaves unexposed polymer and gives shallow, uneven relief; too aggressive brushing or washout that is too long can attack fine detail. Settings are in the TDS and the processor manual; our flexo plate making process guide covers each step.
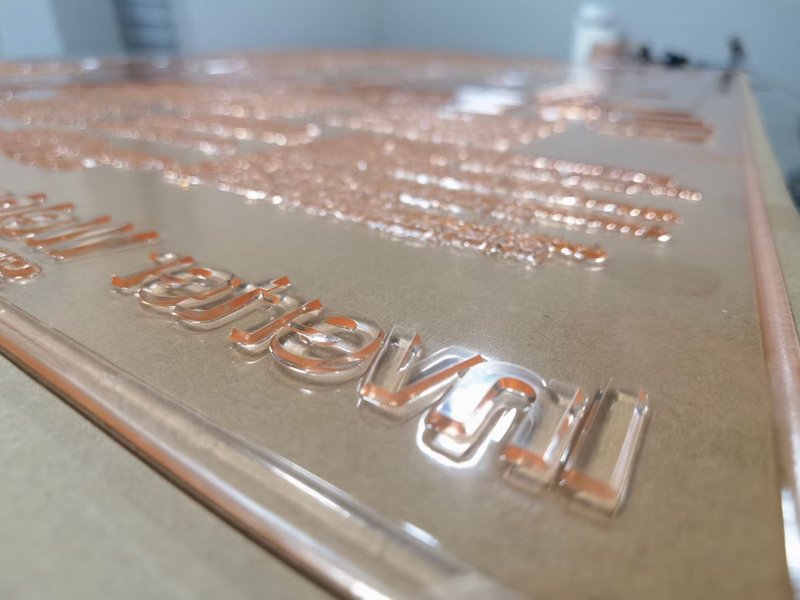
Relief too shallow: symptoms
- Ink fills in reverse text, fine reverses and small open areas.
- The floor prints on the board, especially on corrugated or when impression is heavy.
- Ink bridging between close lines and dots.
- More frequent plate cleaning on press.
Common causes: back exposure too long, ageing back exposure lamps compensated by habit rather than measurement, or incomplete washout.
Relief too deep: symptoms
- Small dots fall over or bend, and isolated highlight dots break off.
- Thin lines and fine text wave or distort.
- Uneven dot gain because fine elements flex under impression.
- Longer washout and drying time with no print benefit.
Common causes: back exposure too short, a new lamp set without a new step test, or over-washing. The belief that deeper relief is always safer causes many of these problems. Relief must match the gauge and job: too deep weakens fine dots, too shallow fills reverses and lets the floor print.
How to measure relief depth
You need a precise thickness gauge (a dial or digital gauge with a flat foot and light contact pressure) and a processed plate with an open floor area:
- Measure total thickness on a solid image area.
- Measure floor thickness (base plus floor) in an open, non-image area.
- Relief depth = total thickness minus floor thickness.
- Measure at several points across the plate to check uniformity.
- Record the result with the plate batch, back exposure time and lamp hours.
Reverse depth is different: the depth of fine reverse lines and text is always less than full relief, because the gap is narrow. Check it with a magnifier or a depth gauge on your test form. Our quality control page explains how we inspect plates at the factory.
Relief depth troubleshooting table
| Problem | Likely cause | Corrective action |
|---|---|---|
| Floor prints on the substrate | Relief too shallow; back exposure too long | Repeat step test, reduce back exposure |
| Reverses fill in | Shallow relief or under-washed reverses | Check washout time and brush pressure, reduce back exposure |
| Fine dots bend or break | Relief too deep; floor too thin | Increase back exposure, check main exposure |
| Relief varies across plate | Uneven lamps or washout brushes | Measure lamp intensity, check brushes |
| Relief changes week to week | Lamp ageing, no routine measurement | Log lamp hours, re-run step test on lamp change |
| Plate thicker than nominal after processing | Insufficient drying, solvent still in plate | Extend drying per TDS before measuring |
Relief is the plate maker’s problem only in the sense that it is set in the plate room. If you buy processed plates from a trade shop, ask them to state relief on the delivery note. If you process plates yourself, our technical support can help set up a step test for our grades. Exposure, washout and drying units are available as flexo plate processors supplied with our partner factories.
FAQ
What is relief depth on a flexo plate?
Relief depth is the height of the printing image above the plate floor. It equals total plate thickness minus the thickness of the polyester base and the cured floor.
How is flexo plate relief depth controlled?
Relief depth is controlled mainly by back exposure time, which sets floor thickness, and by correct washout. A back exposure step test finds the time that gives the relief recommended in the grade TDS.
What happens if flexo relief is too shallow?
Shallow relief lets ink fill in reverses, causes bridging between close elements and lets the floor print on the substrate, especially on corrugated board or under heavy impression.
What happens if flexo relief is too deep?
Too deep relief leaves fine dots and thin lines poorly supported, so they bend, fall over or break and dot gain becomes unstable. It also lengthens washout and drying with no print benefit.
How do you measure flexo plate relief depth?
Measure total thickness on a solid area and floor thickness on an open area with a precise thickness gauge, then subtract. Check several points across the plate and record the result with the back exposure time.
Setting up relief for a new plate grade? Request a quote with plate gauge, application, processing route, ink system and sheet size, and we will send the grade TDS with recommended relief. Or request trial plates / contact us.
Disclaimer: values on this page are typical and for reference only; final specifications, MOQ, price and lead time are subject to the grade TDS and the quotation.


